ePortefolio Ida Brandão
Arduino Programming
Coding
Blink
This is the first program that we will experiment with together! This sequence of instructions will switch an LED connected to pin 13 of the Arduino, on and off, once every second.
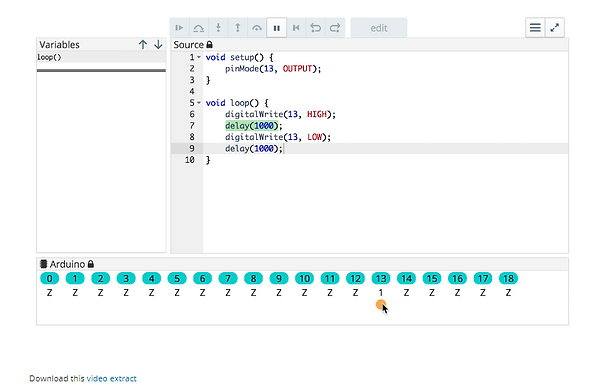
Codecast
To start Codecast, press the play button and let it guide you! Remember that you can press the pause button at any time, to stop Codecast and go back with the time bar ... Over to you!
If you have any difficulty, click here for information on how to use codecast
You can download the transcript of the video here.
Arduino or simulator
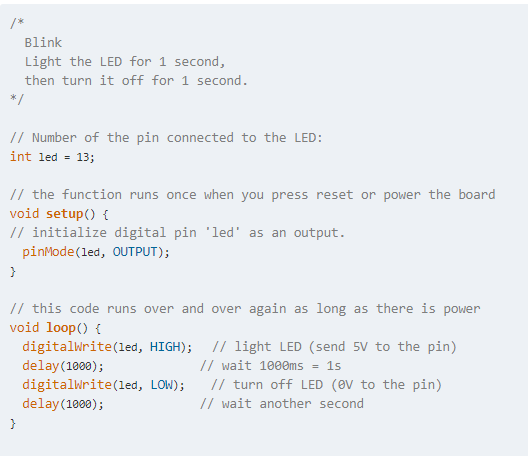
In the Arduino IDE, the program Blink can be found in File→ Examples→ 01.Basics→ Blink. For the Arduino simulator, copy and paste the code below:
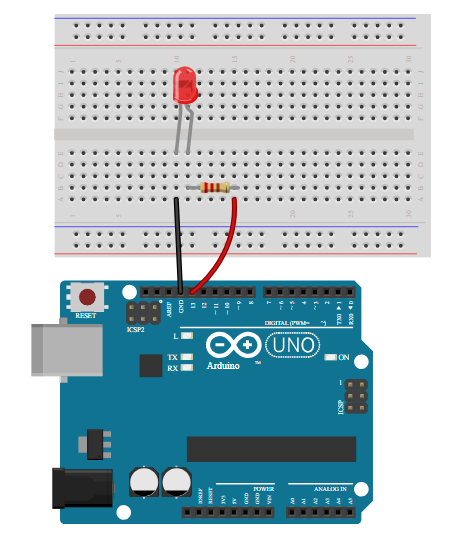
Remember that (unlike regular light bulbs) LEDs only work when connected in a particular direction – check that the - (minus) tab is connected to the GND (ground) pin of your Arduino. To remember this, just think: the shorter leg is the - (minus) leg. The other leg + (plus) must be connected to pin 13 which receives the current:
Instructions
At the end of each program, we will explain all the new code you used. As this is our first program, we have a few things to go over! (do not hesitate to click on the links below to reach the Arduino reference)
In this program, we have:
-
Comments: These lines of text are for people, rather than machines – they are included to help you understand (or remember) how your program works, or to inform others. These lines are not read by Arduino, but they can be very important! There are two ways to create Comments lines:
/* Here is a comment across several lines */
// This is also a comment
-
The code:
-
Declaring a variable: we want to create a new variable, give it a name, and store a number in it.
int led = 13;
In this case, we have a variable called led which is going to be a number (the key word int stands for integer, which means a whole number) and we set it equal to the value 13.
-
Blocks of code: setup contains all the instructions that are executed when the program starts. La fonction setup is only executed once, when the Arduino board is switched on or when you press the reset button. loop contains instructions which are executed over and over again as long as the Arduino has power.
The two functions / blocks of code inside setup and loop are necessary for every Arduino programme, even if they're empty (i.e. even if they don't contain instructions) - which would look like this:
void setup() { }
void loop() { }
-
Functions: are instructions that allow you to execute one or more actions. They are defined with:
-
A name: the name of the function
-
One or two inputs: variables passed into the function are called parameters or arguments. These arguments are put in brackets after the function name.
-
Outputs: the result of the function, which you might want to store in a variable.
-
Let's take the following function as an example:
digitalWrite(led, HIGH);
In this case, the name of the function is digitalWrite. We pass two parameters into the function: ledand HIGH. digitalWrite doesn't have an output here - what it does is write to the Arduino pin named in the first input, the value named in the second input. When the second argument is HIGH, we therefore turn on the LED. When we want to turn off the LED, we set the second argument to LOW.
Other functions we have in the Blink script:
-
pinMode sets the specified pin to be an input our output (in this case we pass OUTPUT as the second parameter:
pinMode(led, OUTPUT);
-
delay pauses the program for a number of milliseconds (thousanths of a second) which is passed as its parameter:
delay(1000);
References:
Language reference in Arduino website - Functions - Variables - Structure - https://www.arduino.cc/reference/en/